Ingredients
Scale
Pie Crust Dough
- 2.5 cups pastry flour
- 2.5 sticks cold butter, cubed
- 1 teaspoon salt
- 3 tablespoons coconut sugar
- 8–10 tablespoons ice cold water
- 1 egg, beaten with 1 tbsp water (for egg wash)
Cinnamon Sugar Topping (Optional)
- 1 teaspoon ground cinnamon
- 2 tablespoons coconut sugar
Instructions
Step 1 – Create Your Dough
- Combine your flour, sugar and salt in a food processor (on Amazon) and pulse several times to mix everything well together
- Next, add in your cold butter. Pulse your food processor (on Amazon) intermittently to cut the butter. You’re looking for lima bean-sized chunks of butter coated by your dry ingredients after ~15-20 pulses
- Once you’ve got something resembling a coarse meal, add in your ice water tablespoon by tablespoon. As you add in water, pulse your food processor (on Amazon) to incorporate the liquid and create your dough
- Your dough should come together but still retain some of its coarse “mealy” texture. At this point, stop pulsing your food processor (on Amazon) and remove your dough
Step 2 – Roll Your Dough into Discs
- Push your dough together with the palm of your hands gently until your dough becomes cohesive
- Separate your dough into two even-sized pieces and shape them into round discs. These will be your top and bottom crusts
- Wrap your discs in wax paper or plastic wrap and put them in the fridge to cool for at least 1 hour. Your dough will stay good in the fridge for up to 3 days and up to 3 months in the freezer if you’re making your pie for later
Step 3 – Roll Out Your Pie Crust
- Once your dough has cooled down, take out one disc and lay it on a well-floured flat and dry surface like a cutting board
- Take your rolling pin and begin rolling your dough from the center outwards to flatten it. Be sure to frequently flour and flip your dough so that it doesn’t stick to your board!
- Continue rolling your dough until it has about a 1/4 inch thickness and is at least 2 inches longer than the diameter of your pie plate. The overhang will come in handy later
- When your dough is rolled out, drape it over your rolling pin and place it over and into your pie plate. Use your hands to gentle press the dough into the corners of the plate, but be sure to leave enough overhang over your pie plate
- Fill your pie with your filling (at room temperature or cooler) and repeat steps 1-4 from this phase for the top crust of your pie
Step 4 – Cut and Seal Your Pie Crust
- Start by cutting some of your overhang from both crusts off. You still want to keep about 1/2 inch of dough over the edge of your pie plate, but the rest can go
- Take the overhang from the bottom crust and lap it over the top part, pressing the bottom dough into your top pie crust as you go
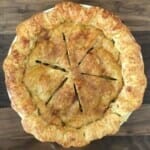
- Optional: Crimp your pie crust edges by pushing dough from the outside of the pie dish with your left hand pointer finger in between your pointer and middle finger on your right hand. Continue around the crust until you’ve crimped your entire pie crust
Step 5 – Finishing Touches
- Start by preheating your oven to 450 degrees Fahrenheit
- To help seal your pie crust and to give a deeper brown crust, brush your top crust with your egg wash, especially in the crevices of your outer crimped edges
- Take a sharp chef knife (on Amazon) and make a few incisions in the top crust to create steam vents for your pie
- Optional: Sprinkle cinnamon sugar over the top of your pie crust. It will stick nicely to the beaten egg you’ve just brushed
Step 6 – Baking Your Pie Crust
- Bake your pie for 20 minutes at 450 degrees. It’s a good idea to use a pie shield here to prevent the exposed outer edges of your pie crust from browning before everything else cooks
- After 20 minutes, reduce the oven heat to 375 degrees and continue to bake your pie for 30-40 minutes until your pie is the perfect golden brown.
Step 7 – Wait Before You Dig In
- For best results, you want to wait at least 2 hours until your pie is complete set before you cut into it and serve your pie. Thereafter, enjoy!
Notes
- Your water needs to be ice cold to help keep the pieces of fat cooled
- Humidity can affect dough performance – if you are in a humid setting, keep an eye on your ratio of flour-fat-liquid
- If you can, freeze your pie crust before baking to help it hold its shape for longer
- Prep Time: 10 mins
- Cook Time: 15 mins
