Whether it’s the pumpkin pie for Thanksgiving or apple pie for the 4th of July, pies are an iconic part of the American baking tradition. And while the fillings may vary, there’s one must-have for any divine pie: a flaky pie crust full of buttery shards in every bite. A well-done, tender homemade pie crust is what turns a good pie into one for the ages.
Surprisingly, this critical piece to the “pie puzzle” leaves even the most expert bakers a little uneasy, even if they needn’t be. Making the perfect pie crust is easier than you think, and it’s something anyone of any baking prowess can do.
Today, we’ll walk through a step-by-step guide making a perfect flaky pie crust with butter that balances tender with crisp, substance with chew, and sweet without being too sweet. By the end of this post, our hope is that you’ll see that the proper pie crust has more to do with skill than with luck, and we hope you’ll feel empowered to give it a try in your own kitchen.
Let’s dive right into how to make the perfect flaky pie crust.
STEP 1: PREPARE YOUR DOUGH
Let’s start with a mini win: you only need four key ingredients for your pie crust! You’ll need some flour for structure and bulk, some fat for flavor and flake, some ice cold liquid to bind it all together, and a pinch of salt (and sometimes sugar!) for flavor and browning. That’s it!
Of course, there are some more things to consider, but it’s important we remember that a proper flaky pie crust with butter is little more than combining the right ratio of these four components into a dough.
Choosing Your Flour and Fat
What flour you use does make a difference in your pie crust. While most people use all purpose flour, really flaky crusts come from using a pastry flour with a lower protein content. Finding a flour like this one (disclosure) with 8.5-9.5% protein (by comparison, all purpose is 10-12%) is step 1 to lighter, more tender crusts. You can swap in different types of nut or whole wheat flours if you have dietary restrictions, but if this is your first go-around with pie crusts, we suggest sticking with a plain pastry flour.
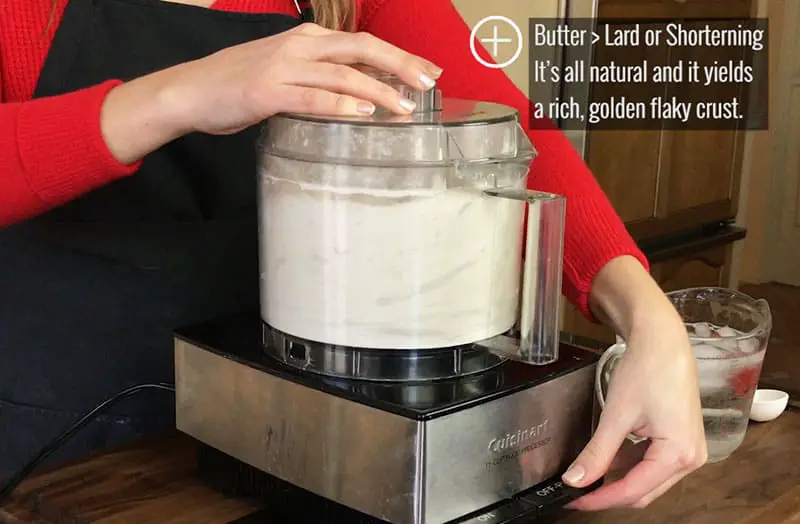
The next most important choice you’ll make for your pie crust is which fat to use. You can probably tell from the title of this article that we have a strong preference for butter, but there are other options out there. Lard and shortening are very common too. You could even make a crust using duck fat! Vegetable, coconut and nut-based oils are great for those looking to great a vegan-friendly crust like the one we made for this apple pie.
Each fat has its own set of advantages and disadvantages, but we’ve found in our tests that butter gives you the best all-natural (which is important to us) balance between flakiness and flavor in your crust.
With your butter and flour (and a pinch of salt) ready, start by putting them together in a food processor (on Amazon) or a large mixing bowl with a pastry cutter.
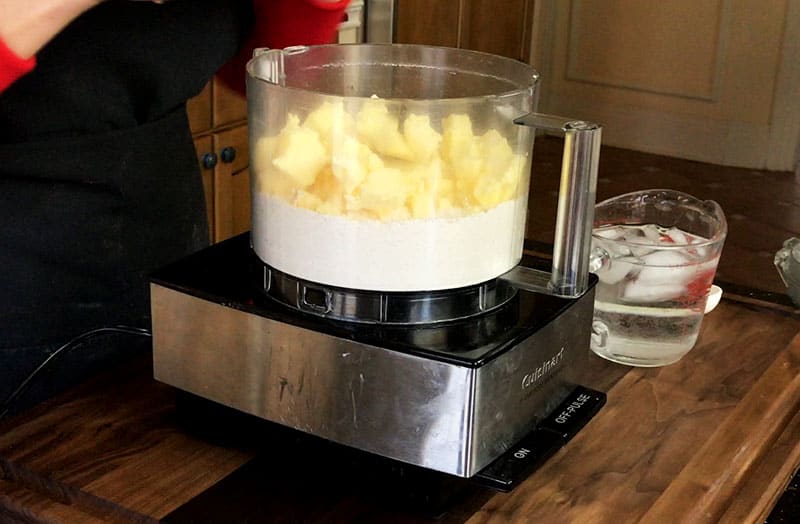
If you’re using a food processor (on Amazon) like we are, you’ll start to pulse the mixture together so that your flour starts to coat your butter. It’s important to pulse your food processor (on Amazon) so as not to cut your butter too small and heat it up too quickly. We need our butter to stay relatively cool and distinctly separate from the flour.
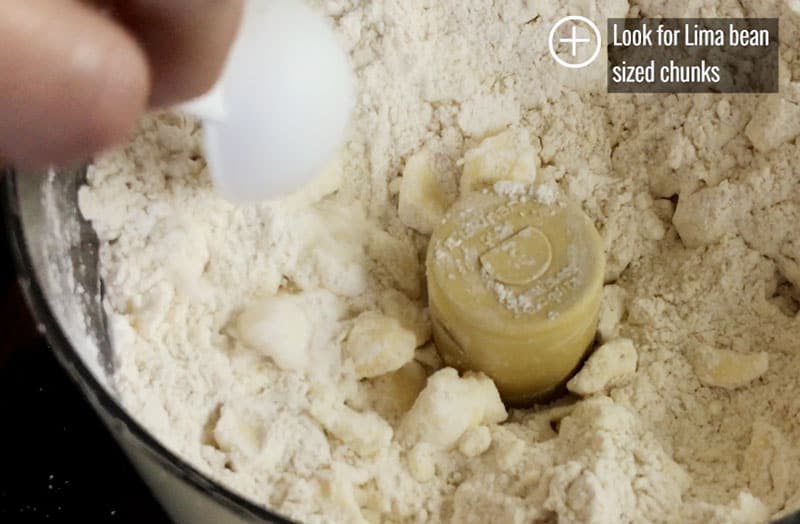
For the flakiest results, our suggestion is to continue pulsing your flour and butter together until you see lima-bean sized chunks like what you see below:
Adding Your Liquid
At this point, you’re almost done… except we need to turn this into an actual dough.
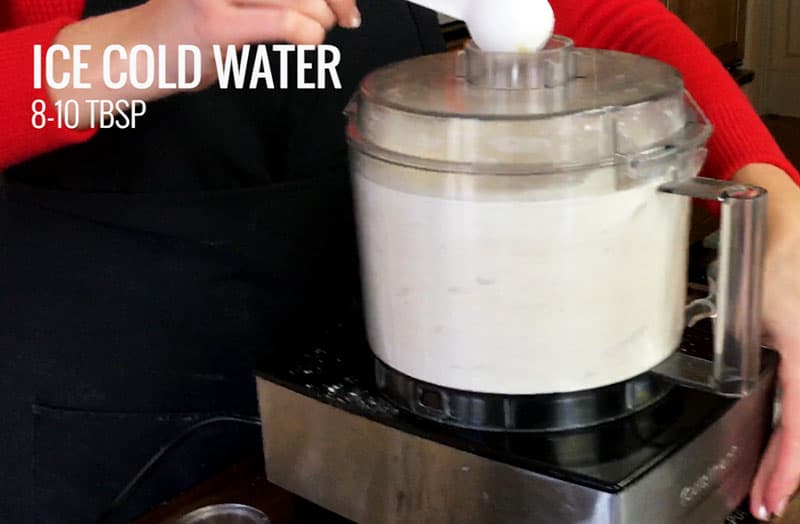
We achieve this by adding ice cold liquid. We recommend 8-10 tablespoons of ice water because it’s easily and readily available, but there’s a lot of wiggle room here. Some recipes suggest using lemon juice and vinegar, while others may even use an 80+ proof alcohol like vodka or brandy to curb gluten production! Whatever combination of liquids you choose, they need to be ice cold to help your fat pieces stay intact and not melted.
Another thing to keep in mind is that the humidity of your environment affects your dough, so you might need to add less liquid than the recipe calls for. This is definitely something to keep an eye out for.
For simplicity’s sake, we’re sticking with ice cold water. You’ll want to add it tablespoon by tablespoon, pulsing your food processor as you go.
As you keep pulsing, you’ll start to see your dough coming together. If you try and feel it at this point, you should be able to press into it, but you want to still see some crumble and pockets of your fat clumped together.
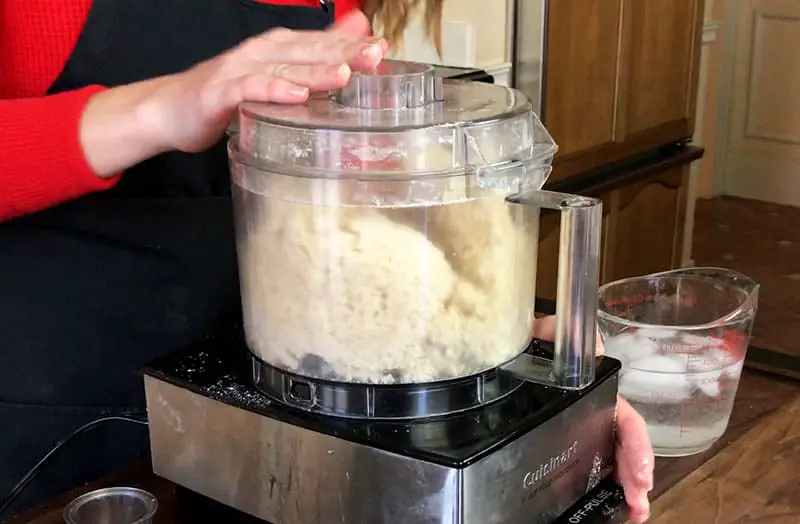
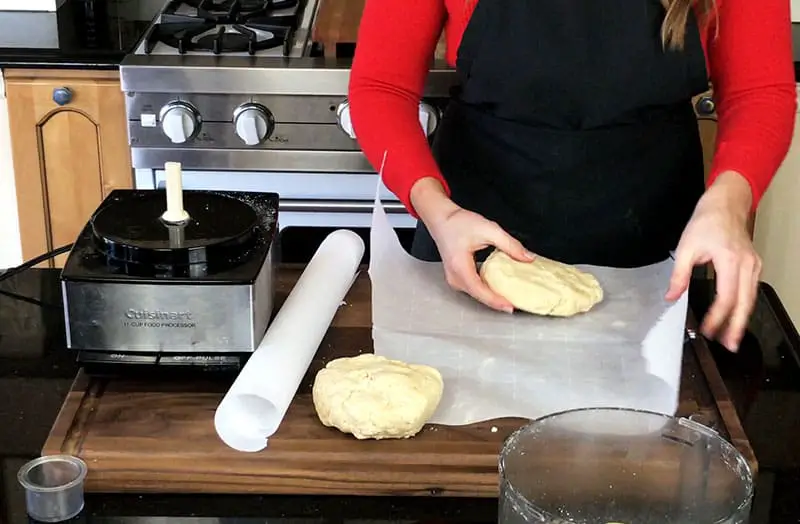
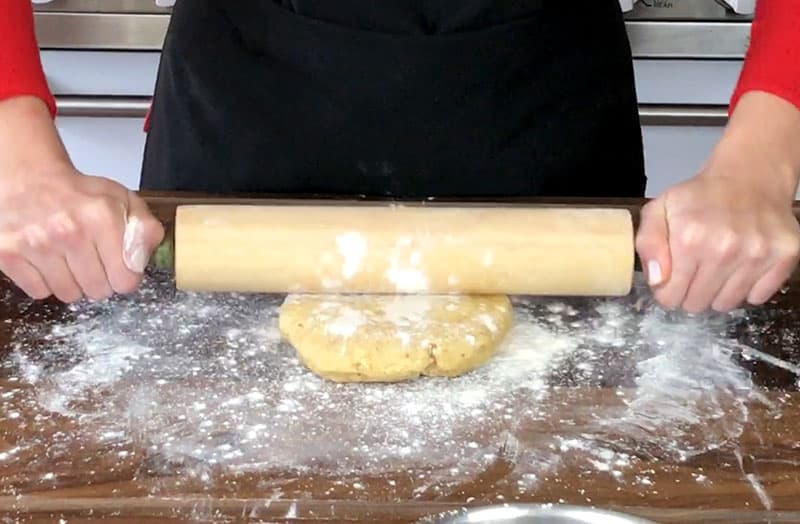
After your dough has started to form, pour it out on a cutting board – one large enough to give you enough space to work with – and use your hands to press your dough together.
Split your dough into two separate discs, then wrap them in wax paper or plastic wrap and place them in the fridge for at least an hour (or up to three days). We want the fat to cool down and re-constitute before moving on.
STEP 2: PICKING THE RIGHT PIE PLATE
Believe it or not, much of the success in your flaky pie crust depends on the type of plate you choose to bake with. There are three common types of pie dishes to choose from each with their own sets of pros and cons:
Aluminum Pans
Aluminum pans are the most inexpensive of the bunch, but with it comes a hidden cost.
Most mass-produced aluminum pans are made to be very thin and are very reactive to sudden temperature fluctuations. They heat and cool very quickly but not evenly, so it’s not uncommon for you to have uneven “hot spots” and “cold spots” throughout your pie crust after baking. Disposable aluminum foil pans are even worse in this respect.
Furthermore, many coated aluminum pans tend to not be very knife friendly. One wrong cut with your knife and your pan now has scratch marks and the chemicals from the coating are released near your pie. It’s not a great mix.
Glass Plates
Glass and Pyrex dishes are a nice middle of the road option balancing cost with function.
They distribute heat more evenly than aluminum for more predictable results with your crust, and it’s nice that you can see how your pie is baking through the clear glass bottom.
Where glass plates fall short is in the area of dough shrinkage. Yes, dough shrinkage is a thing. The dough “slips” down your pan during baking and leaves you with a stockier (less flaky) pie crust that’s a little harder on the fork than you may want. One of the best remedies for dough shrinkage is to keep your pie plate in the fridge or freezer right before baking, but glass plates can’t handle that type of temperature fluctuation and will shatter mid-bake.
Ceramic Dishes
We come now to our pie plate of choice: a sturdy, reliable thick-bottomed ceramic.
Well-made ceramic dishes tend to be a little more expensive than their glass counterparts, but they conduct slow even heat for consistent and predictable baking because they absorb heat instead of reflecting. Ceramics can also better handle temperature fluctuations and can help you mitigate the whole dough shrinkage issue.
In addition to being a beautiful serving vessel, stoneware tends to be naturally nonstick as well, making clean up super easy once the pie has been enjoyed. Since these dishes last you years, that time saved on cleanup adds up.
Our Choice
When it comes to a proper decorative ceramic pie dish, however, not all plates are created equal. Mass-produced goods made overseas can be made with suspicious ingredients – like clays containing lead deposits or glazes and paints containing artificial additives – that seep into your food over time.
For better, healthier baking, your best bet is to go with a dish that’s made locally with 100% all natural ingredients from start to finish. That’s why we’re going with our ceramic pie plate from our lavender collection today.
Once you have your pie dish of choice ready, let’s move onto step 3.
STEP 3: ROLLING OUT YOUR FLAKY PIE CRUST
Now that your dough has had some time to rest and become more elastic (and the fat re-coagulates into big pieces again), it’s time to take out your first disc and roll it flat. Leave the other disc in the fridge for now to keep it cool.
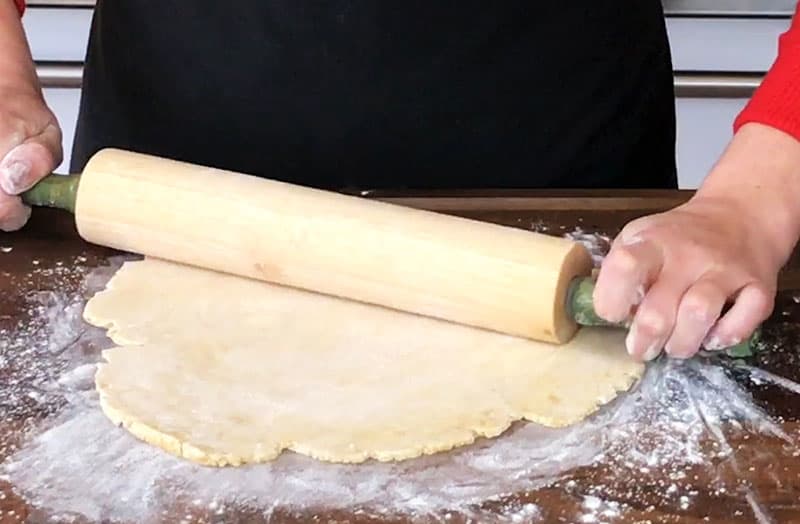
Place your unwrapped disc onto a clean, dry surface that’s been generously dusted with flour. Start by lightly pressing both sides of the disc into the flour, then start with your rolling pin.
The best way to roll your dough is to start from the center and move your rolling pin outward until you’ve gotten your pie crust to a ~1/4 inch thickness. Ideally, you want a pie crust with at least 2 inches in diameter extra than the size of your dish, so in our case, we rolled our 1/4″ thick crust out to 11″ in diameter for our 9″ pie plate.
It helps a lot to have extra space when rolling and flattening your dough – which is why we prefer using a large wood cutting board – so that you have that much needed “wiggle room” without dirtying your entire kitchen.
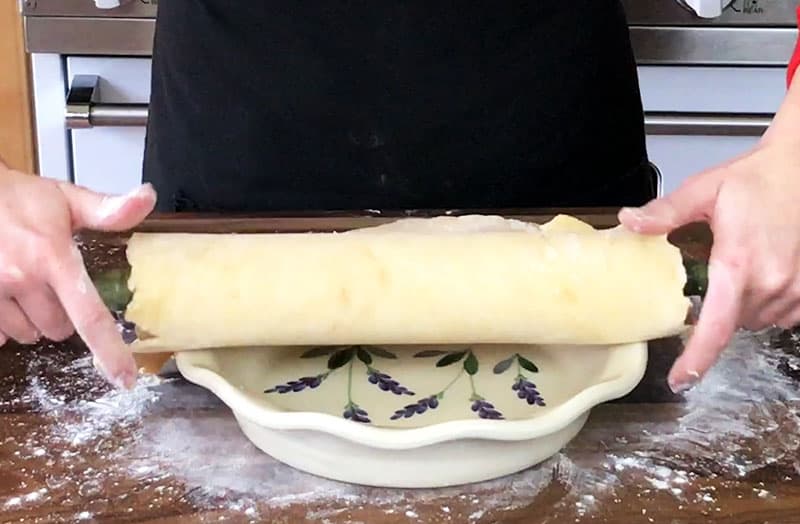
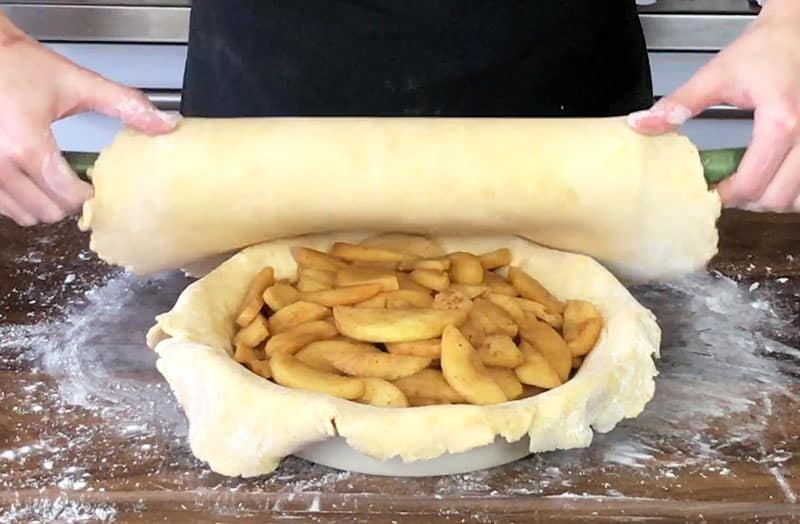
Next, we’re going to place our freshly rolled pie crust over and into our pie plate. Drape your pie crust over your rolling pin, and use the pin to delicately place your dough over the dish. Then, you’ll just gentle press it to form against the pie plate.
Depending on who you ask, you may hear a suggestion to par bake, or pre-cook, your pie crust before the rest of the pie. From our perspective, this introduces more risk of overbaking your bottom crust than it’s worth, although even heat distribution from ceramic bakeware does help mitigate this.
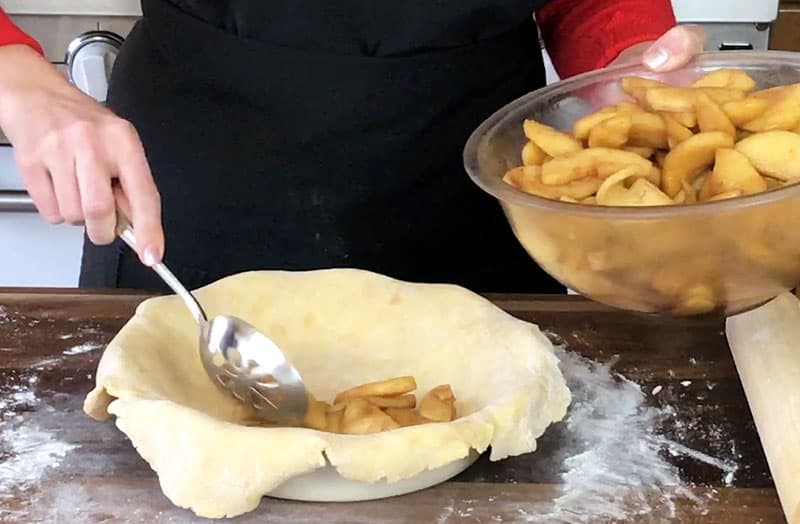
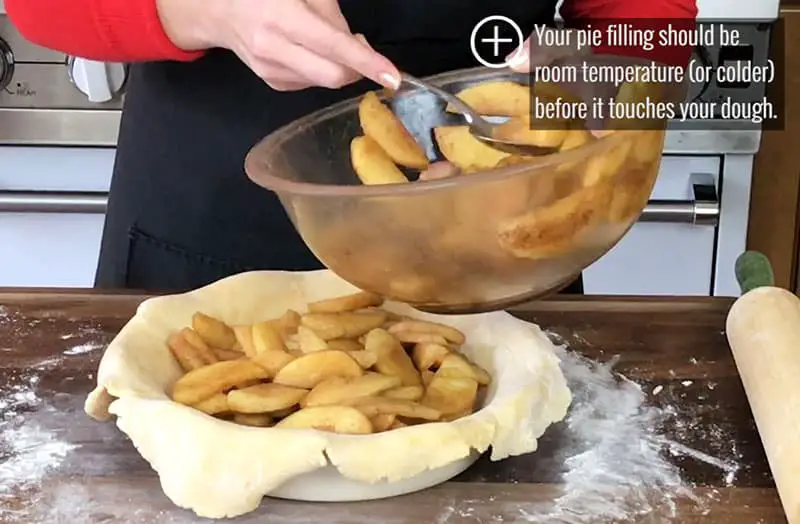
Instead, we like moving directly to your filling. Ladle your filling spoonful by spoonful into your bottom pie dough, and be mindful to use a slotted spoon to get rid of excess liquid. The enemy of a flaky pie crust is extra moisture!
If you’re not making a top crust like we are, then you can cut the overhang of dough since you’re nearly done! What we suggest you do is refrigerate or freeze (if you’re using a ceramic dish) your crust to re-cool it before baking. More on that below.
If you’re making a double crust pie like we are, however, there’s still a little more work to do! We’ll start by rolling the top crust like we did with the bottom.
And just like we did with the bottom, add your top pie crust to the dish by draping it over your rolling pin.
With both crusts rolled out and in place on the dish, you can now cut some of your excess overhang… but not all of it!
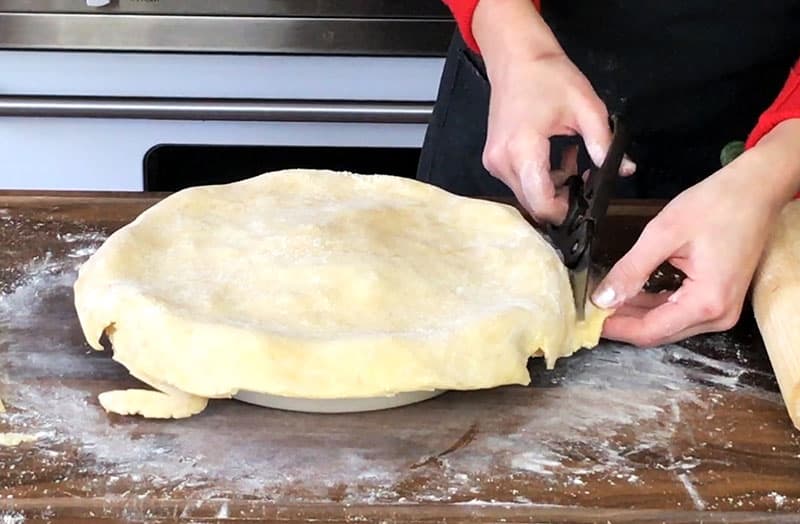
Cut your dough so that there’s still at least 1/2 inch of overhang on your dish. This will give you enough extra dough to pinch and crimp your two pie crusts together.
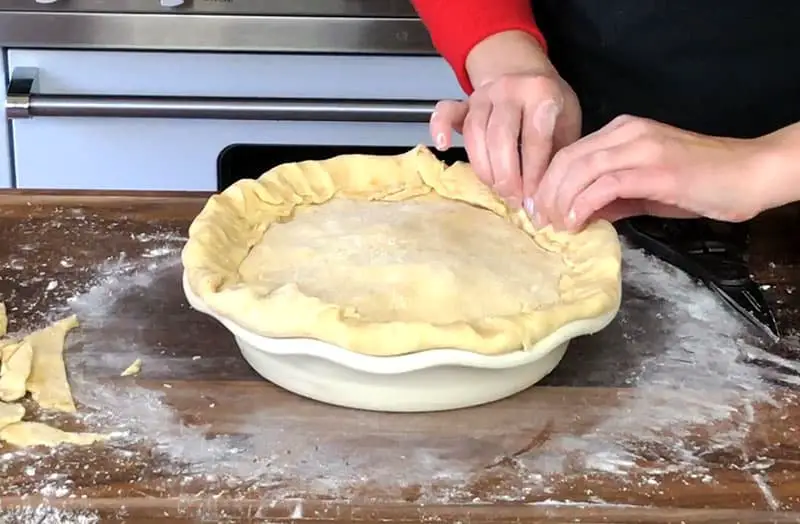
To seal your pie, take the overhang of your bottom crust and loop it over your top crust. Continue to do this around your pie, pinching the bottom overhang into the top crust as you go.
STEP 4: FINISHING TOUCHES
We are now in the homestretch! Just a few more steps to go, and then this pie is ready to bake.
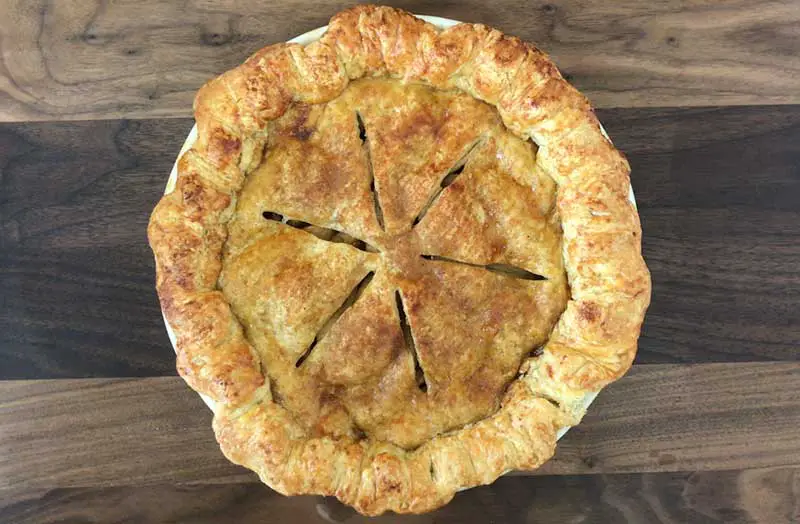
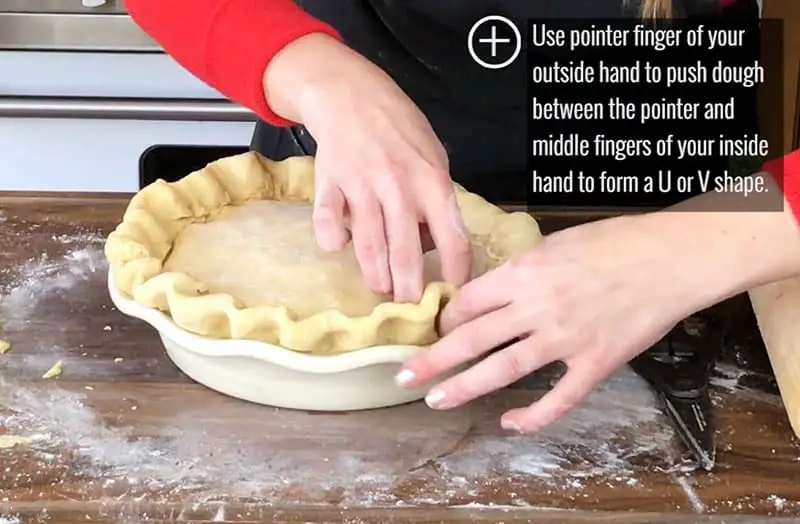
If you want to score a few style points, then crimping is up next. Take your pointer and middle finger from one hand and press your folded crust outward to the rim of your pie dish. With the pointer finger of your other hand, press dough in between your two fingers to create a sort of “zig zag” in your dough.
The beauty about crimping is that it doesn’t have to be absolutely perfect. As the dough bakes and the fat melts, everything will come together and the crimps you have will look really great!
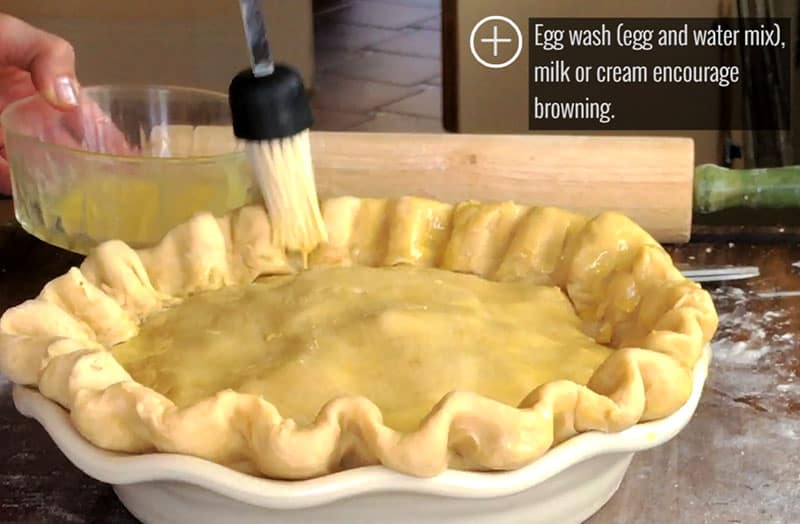
Next, you’ll want to brush your top crust with a beaten egg, especially in the crevices of your crust. Not only will this give you a nice golden brown color, it will help bind the crust together further.
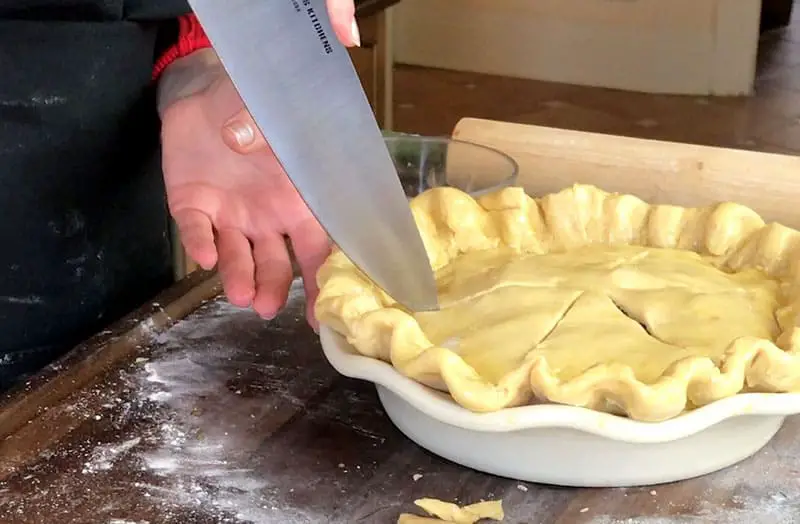
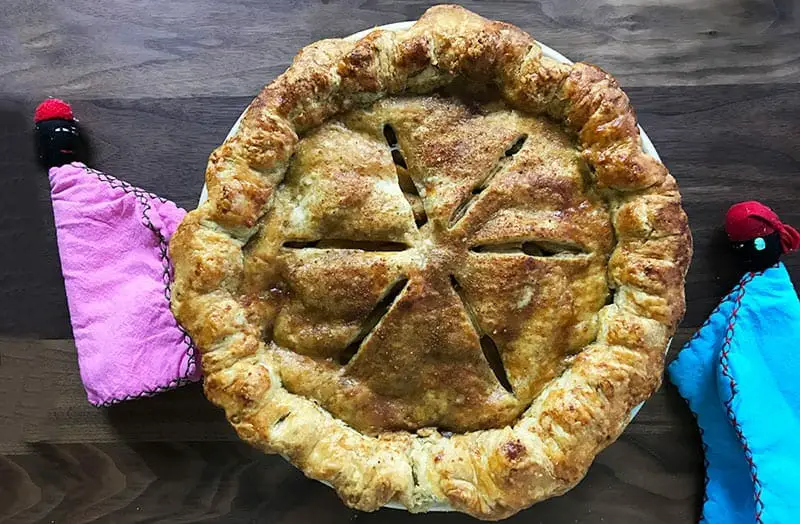
For double-crust pies like ours, you’ll need to cut steam vents to prevent unsightly bubbling in your top crust during baking. Take a very sharp knife – a stainless steel freshly sharpened chef knife (on Amazon) – to cut your vents. You can use the opportunity to cut or poke vents in a pretty pattern in your top crust.
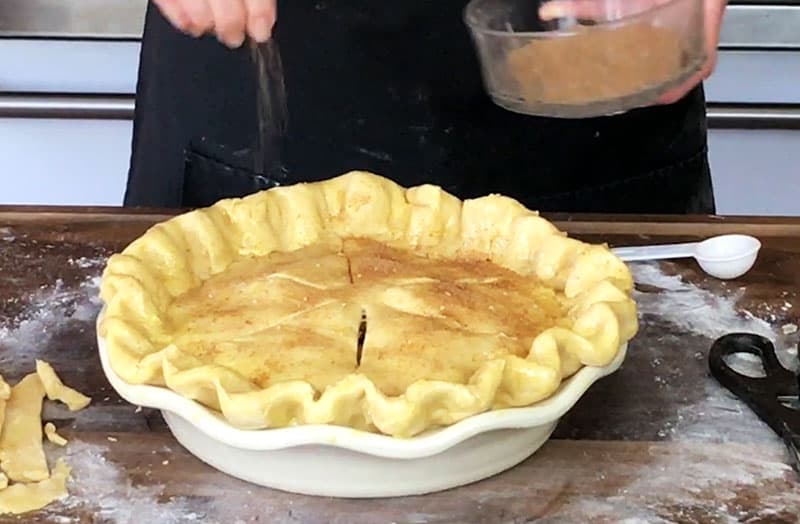
Now this last touch is completely optional, but it does make your pie even more lusciously brown and adds some flavor to your pie crust.
Mix cinnamon sugar together in a small bowl, then drizzle it over your top pie crust. If you brushed the crust with beaten egg before this, the cinnamon sugar will stay in place nicely.
STEP 5: BAKING TIME
We’re here! Your pie is now ready to bake, and you’ll see soon how delightfully golden and your flaky pie crust will be. To help increase your chances of success, we have a few final tips for you.
First, you may want to consider placing your pie crust in the fridge for at least 30 minutes before baking. This re-cools your pie crust and allows the fat to re-coagulate after all the heat-creating work we did during the rolling and crimping.
If you’re using a ceramic pie dish like we are, then you can even place your pie in the freezer for better results. We wouldn’t recommend you do this with glass and aluminum dishes, though, since they are not equipped to handle major temperature variations like ceramic can.
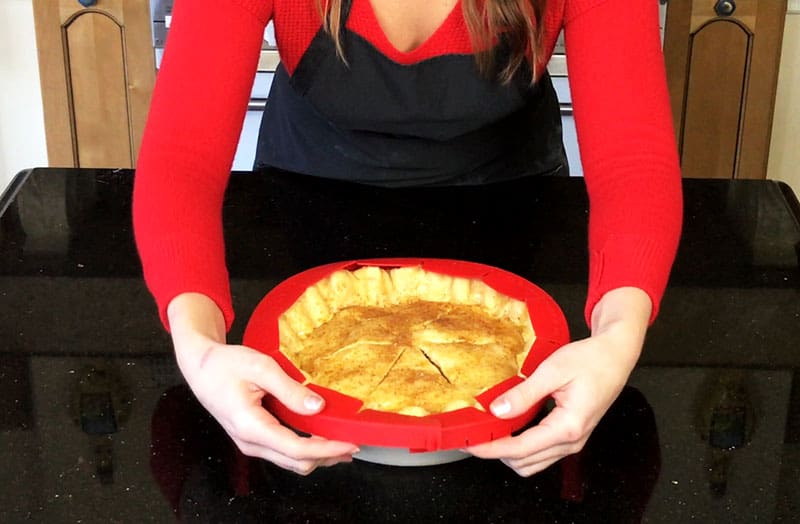
Also, there’s one last safeguard we can suggest to prevent your pie crust’s edges from getting too cooked and potentially burnt: a pie shield! Cover the edges of your flaky pie crust and the circumference of your pie dish. This will help keep these parts from being over-exposed and allow for more even pie baking.
And how long do you bake a pie crust for anyways? Our suggestion for this recipe for a real butter flaky pie crust starts with placing your cooled pie into a 450 degree Fahrenheit oven for 20 minutes. After 20 minutes, you’ll turn the heat down to 375 degrees and let the pie continue cooking for another 30-40 minutes. The first spurt of extremely high heat helps to set the pie crust in place, while the latter baking helps to ensure nice, even doneness all around your crust.
And there you have it! Your pie is done, and your crust is beautiful, flaky tender and oh so delicious.

Pie Crust Perfect Flaky Golden Butter Brown
- Total Time: 1 hour
Ingredients
Pie Crust Dough
- 2.5 cups pastry flour
- 2.5 sticks cold butter, cubed
- 1 teaspoon salt
- 3 tablespoons coconut sugar
- 8–10 tablespoons ice cold water
- 1 egg, beaten with 1 tbsp water (for egg wash)
Cinnamon Sugar Topping (Optional)
- 1 teaspoon ground cinnamon
- 2 tablespoons coconut sugar
Instructions
Step 1 – Create Your Dough
- Combine your flour, sugar and salt in a food processor and pulse several times to mix everything well together
- Next, add in your cold butter. Pulse your food processor intermittently to cut the butter. You’re looking for lima bean-sized chunks of butter coated by your dry ingredients after ~15-20 pulses
- Once you’ve got something resembling a coarse meal, add in your ice water tablespoon by tablespoon. As you add in water, pulse your food processor to incorporate the liquid and create your dough
- Your dough should come together but still retain some of its coarse “mealy” texture. At this point, stop pulsing your food processor and remove your dough
Step 2 – Roll Your Dough into Discs
- Push your dough together with the palm of your hands gently until your dough becomes cohesive
- Separate your dough into two even-sized pieces and shape them into round discs. These will be your top and bottom crusts
- Wrap your discs in wax paper or plastic wrap and put them in the fridge to cool for at least 1 hour. Your dough will stay good in the fridge for up to 3 days and up to 3 months in the freezer if you’re making your pie for later
Step 3 – Roll Out Your Pie Crust
- Once your dough has cooled down, take out one disc and lay it on a well-floured flat and dry surface like a cutting board
- Take your rolling pin and begin rolling your dough from the center outwards to flatten it. Be sure to frequently flour and flip your dough so that it doesn’t stick to your board!
- Continue rolling your dough until it has about a 1/4 inch thickness and is at least 2 inches longer than the diameter of your pie plate. The overhang will come in handy later
- When your dough is rolled out, drape it over your rolling pin and place it over and into your pie plate. Use your hands to gentle press the dough into the corners of the plate, but be sure to leave enough overhang over your pie plate
- Fill your pie with your filling (at room temperature or cooler) and repeat steps 1-4 from this phase for the top crust of your pie
Step 4 – Cut and Seal Your Pie Crust
- Start by cutting some of your overhang from both crusts off. You still want to keep about 1/2 inch of dough over the edge of your pie plate, but the rest can go
- Take the overhang from the bottom crust and lap it over the top part, pressing the bottom dough into your top pie crust as you go
- Optional: Crimp your pie crust edges by pushing dough from the outside of the pie dish with your left hand pointer finger in between your pointer and middle finger on your right hand. Continue around the crust until you’ve crimped your entire pie crust
Step 5 – Finishing Touches
- Start by preheating your oven to 450 degrees Fahrenheit
- To help seal your pie crust and to give a deeper brown crust, brush your top crust with your egg wash, especially in the crevices of your outer crimped edges
- Take a sharp chef knife (on Amazon) and make a few incisions in the top crust to create steam vents for your pie
- Optional: Sprinkle cinnamon sugar over the top of your pie crust. It will stick nicely to the beaten egg you’ve just brushed
Step 6 – Baking Your Pie Crust
- Bake your pie for 20 minutes at 450 degrees. It’s a good idea to use a pie shield here to prevent the exposed outer edges of your pie crust from browning before everything else cooks
- After 20 minutes, reduce the oven heat to 375 degrees and continue to bake your pie for 30-40 minutes until your pie is the perfect golden brown.
Step 7 – Wait Before You Dig In
- For best results, you want to wait at least 2 hours until your pie is complete set before you cut into it and serve your pie. Thereafter, enjoy!
Notes
- Your water needs to be ice cold to help keep the pieces of fat cooled
- Humidity can affect dough performance – if you are in a humid setting, keep an eye on your ratio of flour-fat-liquid
- If you can, freeze your pie crust before baking to help it hold its shape for longer
- Prep Time: 10 mins
- Cook Time: 15 mins
