This chocolate croissant article is originally published on December 2, 2015 by Cyrus Roepers. It is updated October 20, 2022 by Janine Do.
This chocolate croissant recipe uses easy ingredients you would normally expect from a chocolate filled croissant – gluten-free pastry flour (on Amazon), sugar, cinnamon, butter, and cream cheese. However we added a unique twist to the chocolate filling – finely chopped walnuts and (optional) raisins! The result is the most unique-and-chocolately homemade chocolate croissant you’ve ever made!
Ingredients You’ll Need
This recipe is a gluten-free recipe chocolate croissant that doesn’t require any yeast!
For the Dough
- Gluten-Free Pastry Flour (on Amazon)
- butter
- cream cheese
- coconut sugar (or use 1:1 regular sugar)
- vanilla extra
- egg
For the Filling
- Chocolate chips – we love dark chocolate chips but you can use bitter chocolate, bittersweet chocolate or white chocolate, per your preference
- walnuts, finely chopped (for that unique taste we talked about!) – you can skip if you like
- raisins, finely chopped (optional)
- cinnamon
Alternative Ingredients
The filling – if you don’t have chocolate chip, or you’re in a hurry you can skip the filling and simply use Nutella or other Hazelnut or chocolate spread that has a thick consistency.
Substitutes for chocolate chip – instead of chocolate chips, you can also use 5 ounces of chocolate bars, broken up into small pieces of chocolate.
The dough – if you don’t want to make the dough from scratch, Pillsbury crescent rolls will work really well here. It will give this recipe a buttery crispness that’s oh so yummy! Bonus: it already has the shape you’ll need to make the roll!
Note: it most likely won’t be gluten-free.
The Origin of this Traditional Jewish Pastry Version of The Beloved Chocolate Croissant
As we dive deeper and deeper into beloved recipes from various cuisines, there’s one thing that has become abundantly clear to us: there is no such thing as a “clear origin” for any dish.
Rugelach – and its cousin, the croissant, for that matter – is a perfect example of this. The further you go back in time, the more you find that it’s not very different from a recipe developed halfway across the world.
That, to us, is the less appreciated beauty behind our everyday food.

Rugelach, Ashkenazim, Kipfel, and Cream Cheese
Rugelach nowadays is undoubtedly a recipe tied to Jewish cuisine, but it wasn’t necessarily always that way. You might even say, in fact, that the reason we have rugelach is because the Ashkenazim were in the right place at the right time.
The Rise of the Ashkenazim
We’ll start today’s journey in the 1st century AD in the original Jewish homeland, Judea. Until 63 BC, Judea had been an independent Jewish kingdom under the Hasmoneans, but it was an autonomy cut short by General Pompey and the incoming Roman Empire.
At the outset, the first century of Roman rule seems to have been pretty good for Judea. Opened to the a new world market, the local economy began to flourish, and Herod the Great, one of the most influential men in Jewish history, comes into power of the semi-autonomous kingdom.
The Roman-Jewish relationship begins to sour, however, around 66 AD. The Jews stage small rebellions against the Romans primarily on economic and administrative grounds, but this period sets off several centuries of continual marginalizing of the Jews. Judea will proceed to lose its sovereignty and become a fully controlled state of the Roman Empire. By the early 4th century, Emperor Constantine will convert to Christianity, make it the official religion of the Empire and persecute the Jews on religious grounds.
Still, as citizens of the Empire, the Jews are free to move within Roman territory, and many become citizens in other parts of the Empire. By the early 9th century as Charlemagne came to rule the Frankish Empire, he decreed religious tolerance for the Jews and full freedom to practice within his borders.
In an environment absent of religious persecution, Jewish merchants developed deep financial and commercial skills and an “economic Midas touch” that made them an invaluable component of the Frankish economy. By the end of the 11th century, Bishop Rudiger Huzmann invited Jews to migrate to the Germanic town of Speyer along the Rhine and enjoy special privileges and immunities, a move which is considered to be the beginnings of the Ashkenazim.
After several centuries of economic prosperity in Speyer and other Rhineland towns, various geopolitical events pushed the Ashkenazim – originally Jewish inhabitants of Germany – further eastward into the areas of Austria, Poland, Lithuania and Russia. It’s here that the Ashkenazi traditions would develop further, and Yiddish, an Eastern European-inspired variant of Hebrew, would be developed.
And, as it pertains to rugelach, it’s where the Ashkenazim would encounter the first creations of kipfel.
Kipfel: The Original Crescent
It’s funny to think that the croissant, which is nowadays considered to be typically French, didn’t start out as French at all!
The same can also be said for rugelach, as both of these pastries came from a common ancestor: kipfel.
There’s a lot of hearsay as to how and what the origins for kipfel are. It might have been invented following the Franks’ 8th century victory at the Battle of Tours. A more likely story – at least relative to the development of the croissant – brings us to 17th century Austria.
It begins with the Ottomans, who have marched to Austria and have begun to lay siege on the walled-in city of Austria. During the nighttimes, the Ottomans work on developing underground tunnels to bypass the walls and to attack the city from the inside. Their plans are foiled, however, by a group of Viennese bakers who wake early in the morning to begin their work. Hearing the Ottomans and their digging, the bakers alerted the authorities and foiled the attack.
Like we saw with the sachertorte, the Austrians – and particularly in Vienna – proved to be very adept bakers, and the creation of the crescent shaped kipfel was their way of commemorating the victory against the Muslim Ottomans.
Over time, the recipe for kipfel dispersed and its variants invented. The first croissant was made in 19th century France by a Viennese baker, meanwhile the Ashkenazis took the kipfel to create their own version: rugelach.
The Americans and their Cream Cheese
The recipe for rugelach took one greater leap in its evolution in the US, and it’s all thanks to cream cheese.
Originally, rugelach was made with a yeasty sour cream-based dough, and it was a very popular recipe brought by the Ashkenazi Jews to America (bagels, blintzes and pickled cucumbers being other great examples). By the 1950s, which coincided with the popularization of Philadelphia Cream Cheese, cookbooks began to substitute in cream cheese for sour cream into their rugelach recipes.
Eventually, the non-yeast cream-cheese version of the recipe supplanted the original as the American standard for rugelach.
About this Chocolate Croissant Recipe
Before we get into the inevitable debate of to cream cheese or not to cream cheese – for that is the question – let’s first take a look at the name rugelach itself to give us a clue into the pastry itself.
In Yiddish, the suffix ach indicates a plural, while the syllable el serves as the diminutive. The word rog – a Yiddish word derived from the Polish róg – means something close to “horn” in English. And so, our goal with rugelach is to create little horns… and plenty of them.
As to how to make these little twists, we’ll start with the dough.
Before we start – just know that one of the beauties of rugelach is that there’s an infinite number of ways you can make the filling. Some will use chocolate, while others will use jams and preserves. Sometimes raisins are added, when other times it’s just crushed nuts that give that extra texture. No matter what you choose to do, though, just make sure that the filling is either cold (but still easily spreadable) or at room temperature when it comes time to fill your rugelach. You don’t want it melting the dough!
The Rugelach Dough
There are two main schools of thought when it comes to rugelach (at least here in the US). One camp calls for cream cheese in the recipe, while the other half leaves it out like it traditionally was.
If you go more the more traditional route – provided you don’t go pareve with your recipe – you’ll end up using either sour cream or milk in the dough. Even if you go pareve and opt to go dairy free, the process of making the dough is still the same. You’ll combine all your ingredients into either a stand mixer, a food processor (on Amazon) or even into a regular mixing bowl. You’ll combine the ingredients together until they create a soft, clumpy and somewhat sticky dough.
Before doing any baking, you’ll want the dough to sit for at least one hour in cooler temperatures, so wrap it in plastic wrap as you tend to your filling.
Step-by-Step Instructions
In a food processor (on Amazon), combing the dough ingredients and pulse. You might want to add the cream cheese and butter in thirds. Once combined, separate into 2 discs, wrap in plastic and let it chill in the fridge for around 1 hour.
Transfer your dough to a workable surface. Lightly flour a large cutting board (on Amazon) to make an easy floured surface. Alternatively, if you don’t have a large wooden cutting board (on Amazon), use a large sheet of parchment paper and sprinkle it with flour on your kitchen table. With a rolling pin, roll out the dough until it reaches about 1/8 of an inch thickness (around a thickness of quarter or a dime).
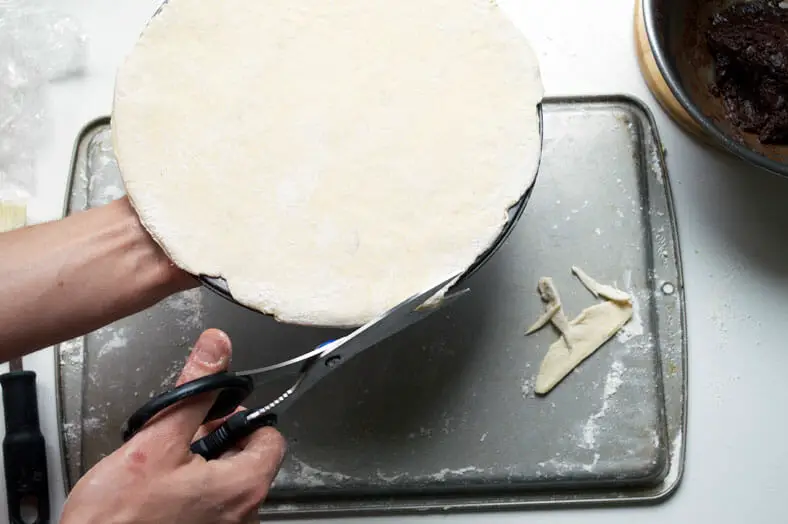
Optional – use the bottom of a cake pan to cut out the shape of a perfect circle.

You’ll take your filling and spread it evenly and smoothly across the surface area of your circular dough. You’ll want to leave at least 1/2″ of give between the circle’s edge and the edge of your filling, since you’ll want some dough to cook together as the pastry base of your rugelach.
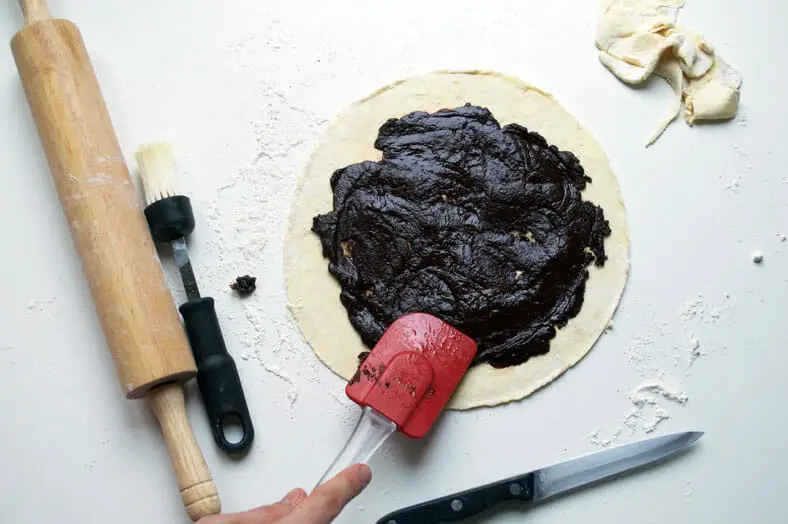
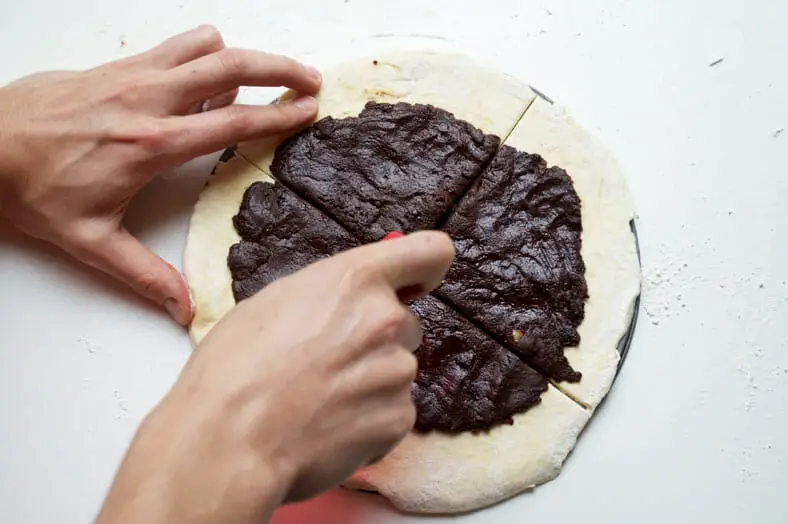
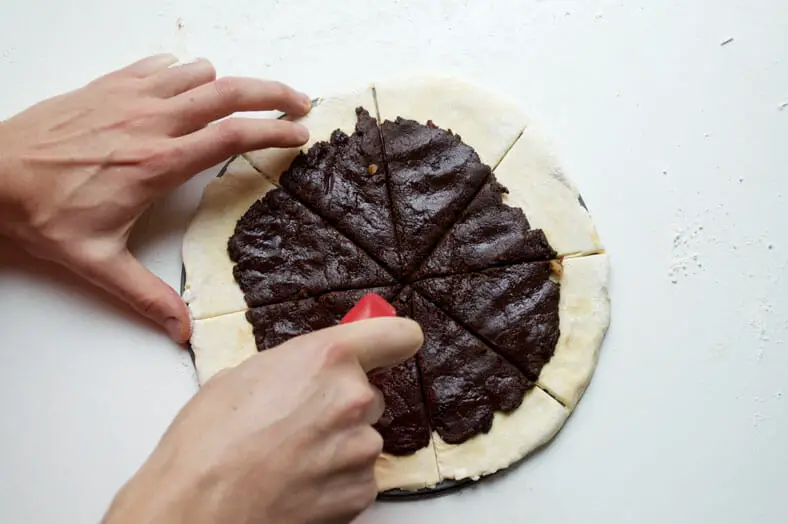
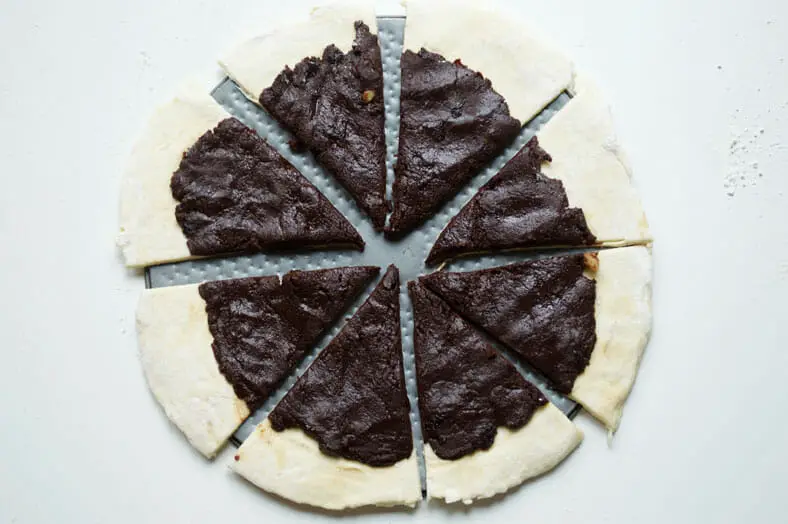
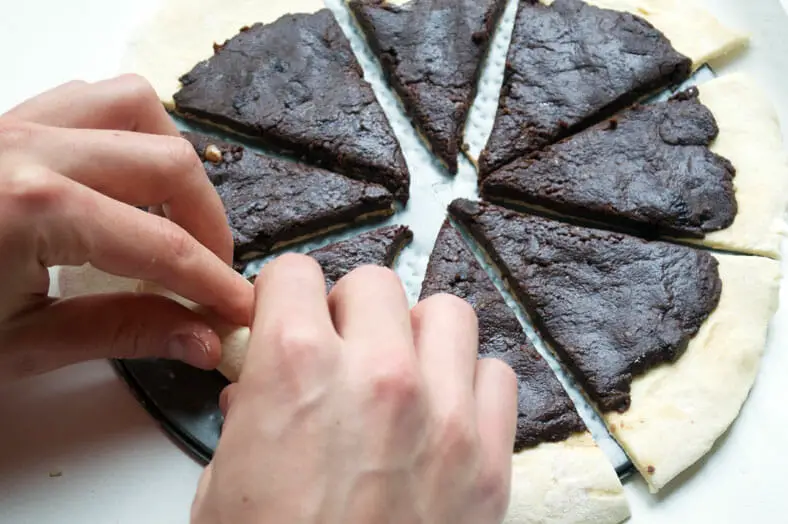
When you have your pastry spread finely across the dough, use a pastry cutter or a knife to cut out 8 symmetrical dough pieces (like cutting a pizza). Take one of your croissant dough and starting from the “crust”, roll inwards until you’ve rolled to the tip of the dough.
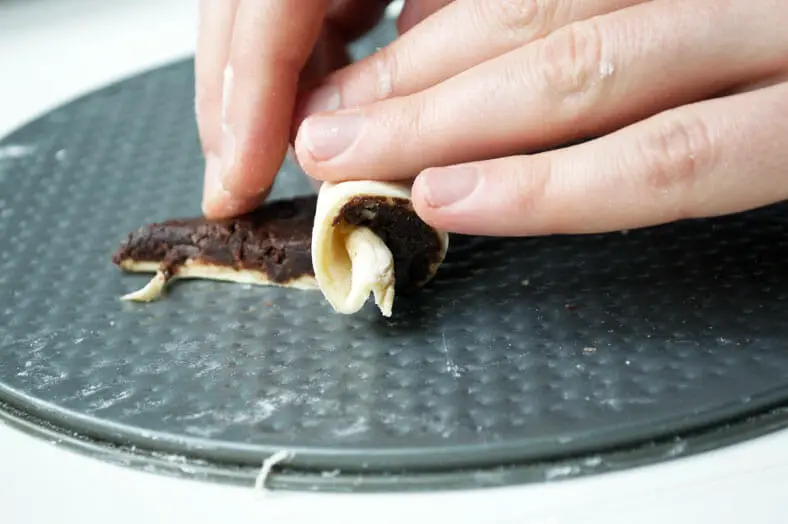
How to Roll The Chocolate Croissant
Start from the outside circle and fold over.
Keep rolling until you reach the end of the crescent shape. Use your middle and index fingers here as you roll to get a tighter crescent roll.

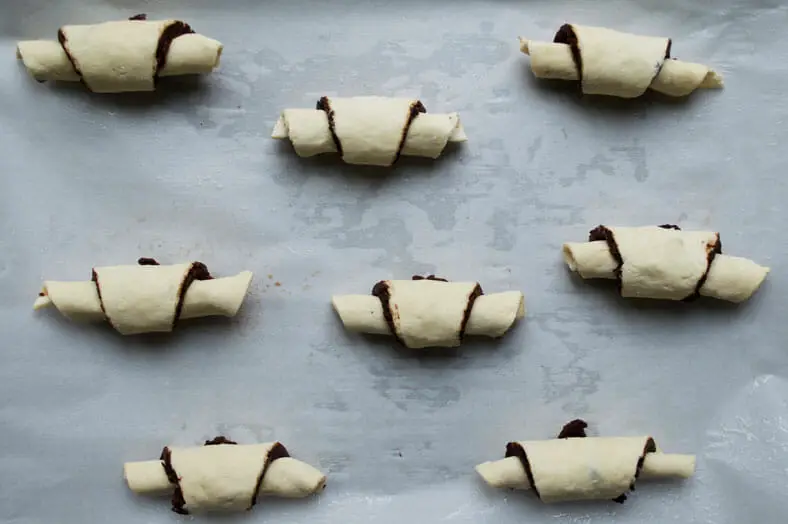
Once you’ve rolled them all, repeat on the other half of the dough. We’ll end up with 16 mini croissants.
Baking Chocolate Croissants
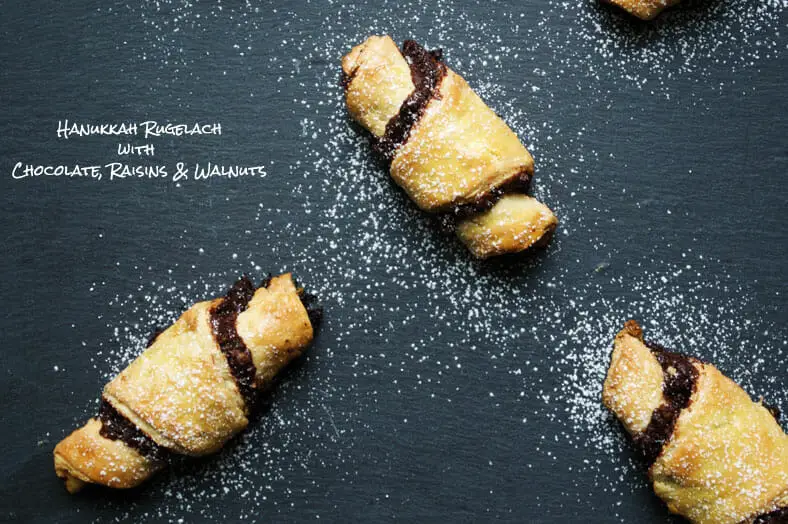
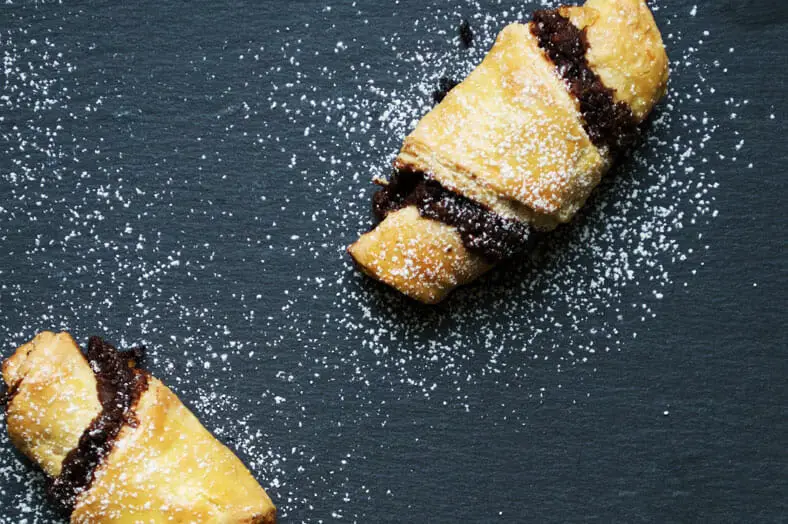
Place your rolled croissants on a baking sheet lined with a piece of parchment paper, bake in the oven for 25 minutes at 375 degrees, or until golden brown, then enjoy! May we suggest powdered sugar, or chocolate drizzle on top?!

Our Take on the Recipe
When it comes to authoritative figures on the rugelach recipe, there’s a plethora of sources to choose from. While Joan Nathan and her Jewish Holiday Cookbook is perhaps the most recognizable in the US, we opted to go another route with our reference recipe. Instead, we chose to base our own version of rugelach off the recipe from Tori Avey, herself an incredibly knowledgable blogger and writer on Jewish cuisine.
Still, as we always do, we made some of our own adjustments to the recipe to match our own preferences. For starters, we scaled the proportions of the recipe way back. Instead of making 40-60 rugelach like the original suggests, now you can safely expect to make anywhere between 18-24.
For the filling, we made our own mashup of some of our favorite looking fillings. For the richest chocolate layers, we combine melted chocolate, raisins, crush walnuts, cinnamon and more.
The end result left us with a filling that was slightly thicker than usual, but there was so much depth to the taste that we couldn’t pass up.
You can add 1-2 tablespoon water for a creamier consistency (not runny!).
For the dough, we made some interesting adjustments to the ingredients added. Per usual, we swapped out regular sugar for coconut sugar. We also added in a dash of vanilla extract, which we thought gave a nice, subtle but uplifting flavor to the rugelach. For the flour, we used a super fine cake flour from Bob’s Red Mill, which we’ve really come to enjoy when it comes to baking more delicate items.
Finally, we swapped out both sour cream and cream cheese for an interesting new ingredient: Greek yogurt cream cheese. While we understand the inherent limitations of making a cream cheese-based recipe healthier, this gave us a helpful alternative to doing just that while still serving the same function as regular cream cheese.
No matter what you end up choosing to do with your rugelach, though, you seriously can’t go wrong. It makes for a perfect holiday treat just as much as it does as a fun year-round dessert.
Enjoy!
What filling would you put in your rugelach? Comment below!

Gluten-Free Chocolate Croissant with Walnuts (Rugelach)
- Total Time: 1 hour 40 minutes
- Yield: 16 Croissants 1x
Description
Rugelach: Croissant Pastries Stuffed with Chocolate, Raisins and Walnuts with cream cheese.
Ingredients
Dough
- 1 cup super fine gluten-free pastry flour (on Amazon)
- 1/2 cup grass-fed butter, cubed
- 4 ounces cream cheese
- 1 large egg
- 1/2 tablespoon coconut sugar
- 1 teaspoon vanilla extract
- 1 teaspoon salt
Filling
- 1/2 cup walnuts, finely chopped
- 3/4 cup chocolate chips
- 1/4 cup raisins, finely chopped
- 2 tablespoons coconut sugar
- 1 teaspoon ground cinnamon
- 2 tablespoons of water
Finishing Touches
- 1 egg, beaten (for eggwash)
Instructions
Stage 1 – Prepare and Chill Rugelach Dough
- In a food processor (on Amazon), pulse together your flour, butter, coconut sugar, vanilla extract, salt and egg. You’ll want to pulse instead of turning the food processor on full-force because the cream cheese and butter cannot melt
- After 6-8 pulses, the dough ingredients should mix together into a rather sticky, wet and clumpy dough. Take the rugelach batter out of the food processor and onto a well-floured surface
- Very lightly roll your dough together into one piece, then separate it into halves and shape each piece into a small disc
- Wrap each disc in plastic wrap, then place into the fridge to cool for at least an hour. In the meantime, you can tend to the rugelach filling
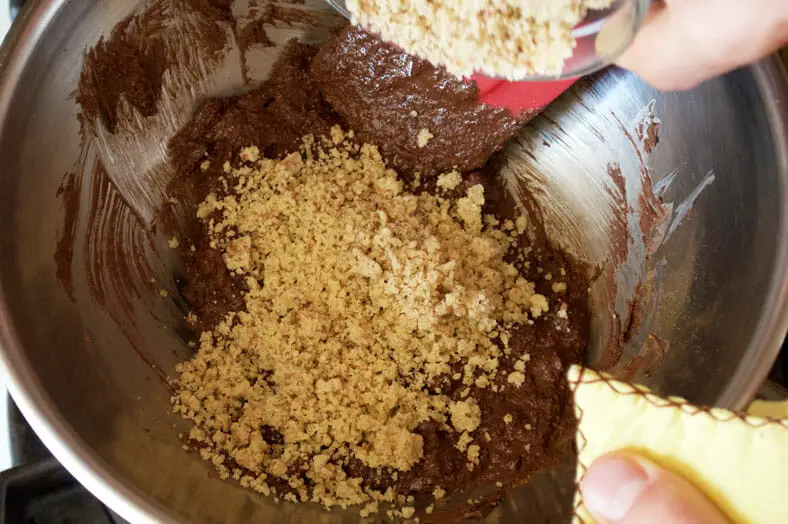
Stage 2 – Prepare Rugelach Filling
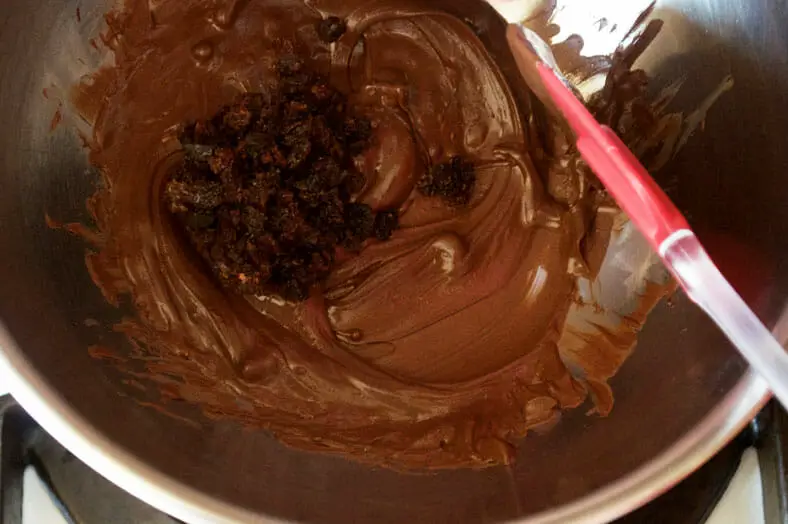
- Start by either using a double boiler or a steel mixing bowl over boiling water to create a bain-marie
- When hot, add in your chocolate chips, then stir with a heat-proof spatula until fully melted
- Next, add in your raisins, coconut sugar and cinnamon, then continue to stir around
- Finally, pour your crushed walnuts into the mixture and continue to stir. By this point, the filling might start to get a little thick, so you can add in a couple tablespoons of water to loosen it up. You don’t want it to be too runny though
- When your filling is ready, take it off the heat and let it cool at room temperature. You don’t want it to be too hot, otherwise it will melt the dough
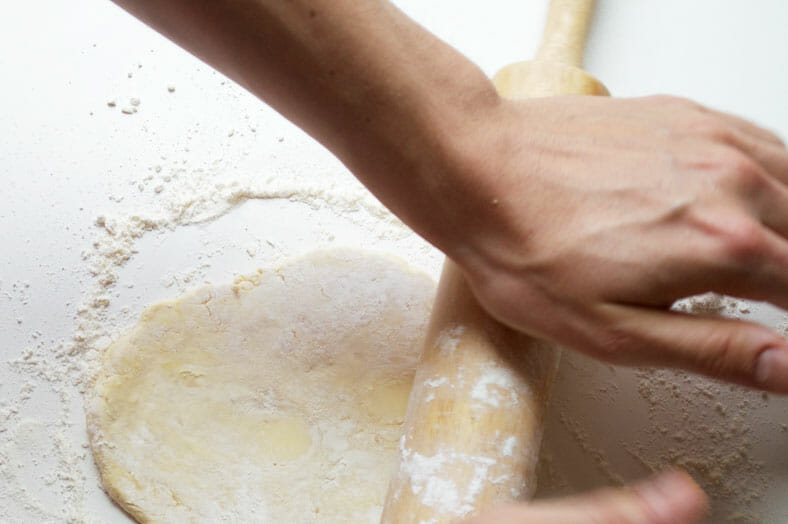
Stage 3 – Roll Out Rugelach Dough
- After an hour, take one disc of dough from the fridge and unwrap it from the plastic wrap
- On a well-floured surface, begin to roll the dough out until it reaches about ~1/8 inch thickness (as thick as a US nickel or dime). Pro Tip: Because the dough is so fickle, roll it out on a cold surface. One way to do this is to place a baking pan in the freezer ahead of time, then roll the rugelach dough on the back side
- Take the bottom of a cake pan onto your rugelach dough, and cut away any excess dough as you cut out the shape of a circle. If you notice the dough getting soft at this point, place it back in the fridge for a few minutes to let it cool down
Stage 4 – Create and Bake Rugelach
- Preheat your oven to 375 degrees Fahrenheit at this time
- Next, begin spreading your filling on one side of your dough, leaving about 1/2 inch of space away from the circle’s edges
- Using a pastry cutter or a knife, cut your circle into quarters and then cut the quarters in half to make 8 equally sized slices
- Take one “slice” of your rugelach dough and roll from the outer “crust” inwards. Roll the dough as tightly as you can to capture as much filling as possible inside the pastry
- With your rugelach fully rolled, place it onto a baking sheet lined with parchment paper with the tip of the pastry at the bottom. Repeat for all slices of your dough
- Bake in the oven for 20 minutes, in the final 5 minutes, brush the rugelach with eggwash, then bake again
- After 5 more minutes, take the rugelach out, let cool and enjoy!
Notes
Make sure that the filling is either cold (but still easily spreadable) or at room temperature when it comes time to fill your dough!
- Prep Time: 75 mins
- Cook Time: 25 mins
- Category: Dessert
- Cuisine: Jewish

Interesting discussion of the roots of rugelach. As you pointed out, there are many versions. Yours looks delicious, but IMHO too much filling. It’s all about balance, and not rolling the crescents too lightly. If the dough is rich yet light, and the filling is tasty but not overwhelming, the overall effect is divine.
Thanks Laura! And you’re definitely right about the balance. This particular filling in the recipe does come out thicker than most, but it can be easily amended to be lighter to get closer to that perfect balance 🙂
I have never made Rugelach but I sure want to try as this looks deliciously good!
Thanks Manila Spoon! We can vouch that they are deliciously good and totally worth a try. If you do try them out, let us know 🙂
This looks so good! The step by step photos are great and I love that you included the history of the dish
Thanks Carmella! Glad to hear you liked it. If you give this recipe a whirl, let us know how it goes 🙂
I’ve never tried making rugelach…I’m a beginner baker, so I usually stick to the easy stuff. But it was really interesting learning about the history, and now I am tempted to give this a try! It looks absolutely delicious!
Trust us, Michelle.. we’re definitely beginner bakers too 🙂 The recipe is actually really easy to try out, and the tasty treats at the end are well worth it. If you do give it a try, let us know how it goes!
I. Love. Rugelach! Gotta get my big girl baking pants on and try this.
Hahah please do, Christine, and keep us posted on what you think of it! 🙂